
UNDERSTANDING THE TRANSFORM
The standard Komodo2Alexa/Komodo-X2Alexa transform is divided into two components, the camera match transform and the output transform.
The first component or transform matches the cameras in linear space and outputs the image in log. It takes REDWideGamutRGB/Red Log3G10 footage from the Komodo as the input, linearises the image, matches it to the Alexa, then outputs this match as ARRI LogC/Alexa Wide Gamut.
The second component is an output transform LUT that takes the ARRI LogC/Alexa Wide Gamut image and converts it to Rec709. This takes the flat desaturated log image, applies a LogC to Rec709 2.4 gamma curve, an Alexa Wide Gamut to Rec709 matrix and outputs an image with restored contrast and saturation that will look correct on your display.
WHY TWO TRANSFORMS?
The main reason is so that footage converted with Komodo2Alexa can be integrated into existing colour grading workflows designed for the Alexa, or so that it can integrate alongside footage from the Alexa allowing the same look to be applied to both sets of footage with little or no modifications.
The key component of Komodo2Alexa is the camera match transform. This is actually where the “Alexa look” lives. The output transform, while important, isn’t actually a large part of what gives the Alexa its distinctive look. In most Alexa productions, the default ARRI Rec709 output transform LUT used in camera, is discarded when it comes to grading. And all grading is carried out on the ARRI LogC/Alexa Wide Gamut image. Therefore using just the first component of Komodo2Alexa places the Komodo footage at an equal start point to real Alexa footage. From this point the Komodo footage can be treated as if it was real Alexa footage. Any grade, PowerGrade, look or LUT designed for the Alexa can now be used on the footage with little or no modification.
WHEN YOU MIGHT WANT TO USE A SINGLE COMBINED TRANSFORM
In some situations or workflows it might be necessary to use a single combined transform. A combined transform is useful for previewing the look on-set via a LUT as it would be impractical and unnecessary to use two transforms at this stage. It can also be useful to use a combined LUT at the edit stage so you can work with a more finished looking image. Combined in-camera/on-set LUTs can be found in the Komodo2Alexa/Komodo-X2Alexa Rec709 In-Camera and On-Set LUTs folder. If you purchased the LUT version of Komodo2Alexa, high quality combined LUTs for post production can be found in the Komodo2Alexa/Komodo-X2Alexa Rec709 Post-Production folder.
IMPROVING THE STANDARD ARRI REC709 OUTPUT TRANSFORM
While the standard ARRI Rec709 LUT is probably the best of all camera manufacturer LUTs, it can still be improved on. As part of 2Alexa I have made some modifications to the standard ARRI LUT. These new LUTs have been modified for a more finished look with more filmic saturation. They were born from my research into film emulation. They allow for deeper, richer colours whilst avoiding over-saturation. The new LUT is called ARRI_LogC2Video_709_V2.cube. And a lower contrast wide dynamic range version is called ARRI_LogC2Video_709_WDR_V2.cube.
CAMERA SIDE Setup
Once the in-camera LUTs are installed the only change I make is to set the Tint to +7. The Komodo/Komodo-X tends to lean towards magenta when compared to the Alexa. Depending on the scene, a tint value between +5 to +10 will usually be required to match the Alexa. Splitting the difference and selecting +7 will be accurate enough for most situations and further fine tuning can be left till post.
LUT INSTALLATION AND USAGE
RESOLVE LUT INSTALLATION
Extract the zip file, open Resolve and bring up Project Settings. Navigate to the Color Management tab on the left and scroll down to Lookup Tables. Click the Open LUT folder and copy over the Komodo2Alexa/Komodo-X2Alexa folder. If you also want the all-in-one Rec709 versions you can copy the Komodo2Alexa/Komodo-X2Alexa Rec709 Post-Production folder as well. Navigate back to Resolve and click the Update Lists button. The LUTs will now be accessible inside Resolve.
Komodo2Alexa IN-CAMERA LUT INSTALLATION
The in-camera LUTs can be found in the Komodo2Alexa Rec709 In-Camera and On-Set LUTs folder. To install create a “luts” folder on your CFast card and copy over Komodo2Alexa_Rec709_OnSet_WDR.cube and Komodo2Alexa_Rec709_OnSet.cube. Import the LUTs on the Komodo and make sure your color space is set to RedWideGamutRGB.
Komodo-X2Alexa IN-CAMERA LUT INSTALLATION
The in-camera LUTs can be found in the Komodo-X2Alexa Rec709 In-Camera and On-Set LUTs folder. To install create a “luts” folder on your CFast Express card and copy over any or all of the following LUTs - Komodo-X2Alexa_Rec709_OnSetWDR_V2.cube, Komodo2Alexa_Rec709_OnSet_V2.cube, Komodo2Alexa_Rec709_OnSet_V3.cube. Import the LUTs on the Komodo-X and make sure your colour space is set to RedWideGamutRGB.
USING THE LUTS IN RESOLVE

This is the basic node structure I use with the LUTs.
For the LUTs to behave correctly make sure your colour space in the raw tab is set to REDWideGamutRGB and your gamma curve is set to Log3G10.
Node 01 is noise reduction. I generally use Spatial NR with Mode set to Faster, Radius set to Small. Then under Spatial Threshold I unlink Luma and Chroma and leave Luma at 0.0 and set Chroma to around 8.0.
Node 02 is the Komodo2Alexa_LogC transform LUT.
Node 03 is used for fine tuning the image balance, generally using contrast/pivot and offset. The idea here is to correct for shot to shot differences as the overall balance is best handled in the raw tab. If the footage is Prores, the bulk of the balancing will take place in this node. The less you do prior to the LogC LUT, the more accurate the conversion. I would limit any pre LUT adjustments to just temperature and tint. In general as long as your exposure is matched, temperature and tint is all that is required to match the Komodo to the Alexa. +7 for tint is a good place to start.
The gap between Node 03 and 04 this is where creative grading takes place.
Node 04 is the output LUT. This node handles the conversion of ARRI LogC to Rec709. Select a LUT from the Alexa Rec709 folder or any other LUT designed for ARRI LogC. You can also use a Color Space Transform node to handle the conversion for extra flexibility.
POWERGRADE INSTALLATION AND USAGE
POWERGRADE INSTALLATION
To install the PowerGrades in Resolve, in the Gallery tab navigate to the PowerGrade 1 stills album. Adding the PowerGrades to this album will allow you to access the PowerGrades from any project and it also means you only have to add it once. Once selected second mouse button click in the gallery window background and select Import. Navigate to the directory where the zip file was extracted and select the .dpx files and click import. If it doesn’t let you select a file, you might need to click the options button at the bottom of the import window and then select .dpx or .drx from the list, then try again.
Once installed the PowerGrades can be applied to the selected shot by middle mouse button clicking on the still in the gallery. Or with a second mouse button click and then selecting Apply Grade.
Along with the PowerGrades you’ll need to install the ARRI LogC to Rec709 conversion LUTs. In Resolve, navigate to the Color Management tab on the left and scroll down to Lookup Tables. Click the Open LUT folder and copy the Komodo2Alexa Rec709 LUTs/Komodo-X2Alexa Rec709 LUTs folder to Resolve’s LUT folder. Do not rename this folder and do not place it within any other folders. It needs to sit at the root level. If you do this incorrectly, your footage will remain as flat log gamma after applying the PowerGrade. You will also get a missing LUT error message.
USING THE YRGB Komodo2Alexa POWERGRADE

This is the structure of the Komodo2Alexa PowerGrade node graph. For the PowerGrade to behave correctly make sure your colour space in the raw tab is set to REDWideGamutRGB and your gamma curve is set to Log3G10.
Node 01 is a CST node that transforms Log3G10 to linear.
Node 02 is the 3x3 matrix and the core of the transform. This matrix lives in the RGB mixer and it aligns the Komodo colours to match the Alexa.
Node 03 is for accurate exposure adjustments using the master gain wheel (the slider under the main gain colour wheel), which is especially useful when working with Prores footage. Doubling the gain from 1.00 to 2.00, 2.00 to 4.00 etc increases the exposure by precisely 1 stop each time you double the value. And halving from 1.00 to 0.50, 0.50 to 0.25 etc decreases the exposure by 1 stop each time you halve the value. You can also colour balance by using the gain wheel, which results in more accurate and cleaner results than using the offset wheel and sometimes even better results than the temp/tint controls in the raw tab.
Node 04 is a CST that transforms the image from linear into ARRI LogC. If you have any colours that are clipping or causing issues, try enabling Gamut Mapping in the CST of this node.
Node 05 corrects the individual RGB channels via the RGB curves.
The Gap between Node 05 and 06 is where creative grading takes place.
Node 06 is the highlight roll-off curve. It’s the only creative part of this PowerGrade, hence why it is disabled by default.
Node 07 handles the conversion from ARRI LogC to Rec709.
Much the same as LUT version, avoid making any adjustments prior to the first node as this will affect the transform’s accuracy. Limit any pre PowerGrade adjustments to just temperature and tint. In general as long as your exposure is matched, temperature and tint is all that is required to match the Komodo to the Alexa. +7 for tint is a good place to start. I would also stick to ISO800 and use the gain wheel in the Exposure Node 03 to do accurate exposure adjustments. Any other corrections or creative grading should take place after Node 05 and before Node 07.
Following my standard Alexa workflow, for most grades I remove Nodes 06 and 07 and replace them with a Print Film Emulation (PFE). Either a real PFE LUT or one of my PFE PowerGrade rebuilds. I used to select all the nodes from 01-05, and group them in a Compound Node to clean up the node graph. But now I’ve started not compounding the nodes as I like to do most of my exposure and temp/tint corrections in the Node 03. So keeping the internals of the PowerGrade visible is necessary.
With or without the PFE, all grading takes places after Node 05 but before the output LUT, PFE LUT or PFE PowerGrade.
Similar to the LUT version of the PowerGrade I always put a noise reduction node before Node 01 and I use the same settings as listed in the LUT section above.
UPDATED August 2022- USING THE Komodo2Alexa IPP2 POWERGRADE
This section previously mentioned that the IPP2 workflow was no longer available in Resolve 17. This is incorrect. It’s still possible to use the IPP2 workflow, it’s just the setup method that has changed.
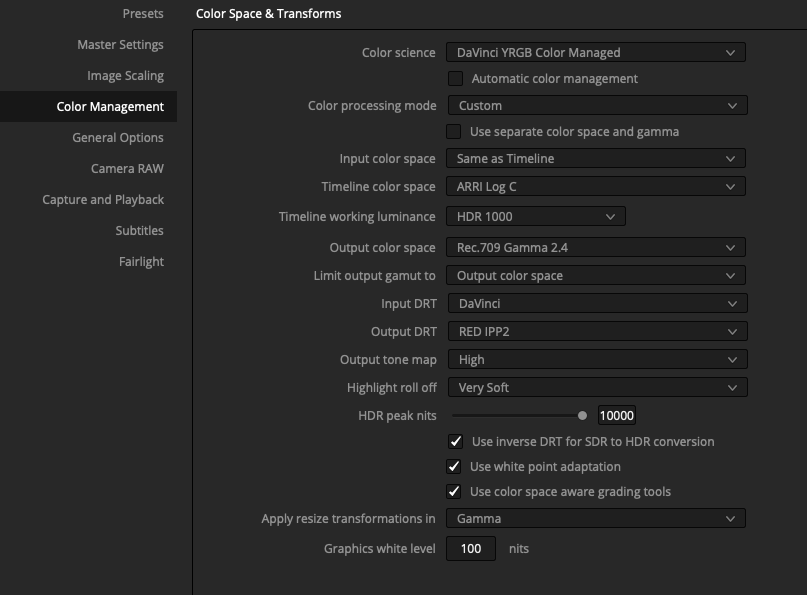
This is how I recommend you setup Resolve’s Color Management for the IPP2 workflow in Resolve 17. The setup is the same for Resolve 18, except the timeline colour space needs to be set to ARRI LogC3. And of course, set IPP2 Output Tone Map and Highlight Roll Off to taste.

Here is the node structure for the IPP2 PowerGrade. Avoid making any adjustments prior to the first node as this will affect the transform’s accuracy. Limit any pre PowerGrade adjustments to temperature/tint/exposure in the raw tab. Exposure and colour balance adjustments can also be made in Node 03 using the gain master wheel and gain colour wheel respectively. All creative grading should take place after Node 05.
OTHER SOFTWARE
The are two methods to use the Komodo2Alexa LUT transforms in other NLEs such as Adobe Premiere.
The easiest method is to use the all-in-one LUTs included with the LUT version of Komodo2Alexa. Apply one of the LUTS from the Komodo2Alexa Rec709 Post-Production folder, then grade underneath this LUT. The way I would set this up in Premiere is to create an Adjustment Layer that sits over the entire timeline. Add a Lumetri effect to the Adjustment Layer and select one of the all-in-one LUTs. Add another Lumetri effect to any clip that needs grading/correction. You can also make adjustments in the raw tab. Corrections to each clip are now happening under the main Adjustment Layer LUT.
The second method is slightly more involved but it’s more accurate and closer to working with real Alexa footage. It It also gives you more flexibility as you can choose to use any output LUT made for ARRI LogC. The way to set this up in Premiere is to apply a Lumetri effect to a clip, then in the Input LUT field select the Komodo2Alexa_LogC.cube LUT from the Komodo2Alexa/Komodo2Alexa LogC folder. Then copy this Lumetri effect to every clip in your timeline. Create an Adjustment Layer that sits over the entire timeline, add a Lumetri effect to it and select any LUT from the Komodo2Alexa/Alexa Rec709. You can also select any LUT made for ARRI LogC. Any corrections made to the Lumetri effect at the clip level are happening under the main Adjustment Layer LUT.