Basic Resolve Node Structure and Order of Operations

 What I really like about Davinci Resolve is the flexibility offered by the node based workflow. There are seemingly endless ways to setup the structure of your grade. And while I sometimes setup some complex node trees, they all generally follow the same basic plan. In this post I'll show you this plan and explain why I use it for the majority of my grades.
Readers of this blog will already be familiar with this structure, but hopefully this post will shed more light onto ideas behind it.
So what's the plan?

Above is the basic plan. Each box doesn't necessarily represent a node but rather an operation that can be made up of any number of nodes. It also shows the order of operation from left to right (if that isn't clear from the large numbers!?).
The basic idea behind this plan is to make corrections in a logical order, each preserving the required image data to properly make the next stage of corrections, and the corrections further on downstream.
To simplify this further into 3 stages. Think of stage one as a global balancing of the image, to lay a solid foundation for your grade. Stage 2 is localised corrections, both technical and aesthetic. Stage 3 is back to global corrections, sitting atop with the theory being that they tie everything together.
1. Balance
Every grade starts with balancing the image on the first node (or if your footage is raw - in the raw tab and the first node). Regardless of whether I'm after a rich saturated grade or a low contrast desaturated grade with milky blacks, I always balance the image with the same standard target in mind. To create a neutral, correctly exposed and suitably saturated image, full of information which makes downstream adjustments such as keying easier. A benefit of this standardised approach is the ease of copying over looks from other projects - a big time saver.
2. Localised Exposure
So once the image is balanced I move onto localised exposure corrections. Think of these corrections as an extension of the cinematography process but at the same time we're able to push the corrections beyond that, and start to make creative exposure decisions.
Maybe the DP didn't have ND grads to lower the exposure of the sky - I bring in a soft edged rectangular power window to take it down. Or maybe there wasn't enough time to flag off one of the lights and there's too much spill/bounce on what should be a dark background - an easy fix with a power window. The aim with these corrections is to be subtle and to make them look like they were achieved in-camera.
The reason I do these corrections at this early stage is because I quite often create looks that add colours to specific luminance values. If these values don't exist prior to the application of the look then the colours from the look can't be added where they need to be. Applying the exposure corrections after the look won't yield the same natural looking results and can sometimes be a give away that an image has been manipulated.
Below is an example. Both of the results actually look somewhat ok, but it still illustrates my point.
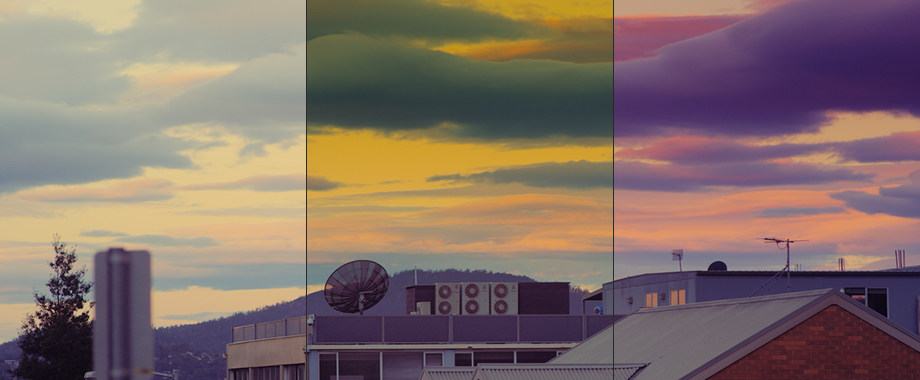
- The first image has been balanced and a look has been applied. The look is quite basic - purple added to the shadows, blue added to the mids and yellow/orange added to the highs.
- In the second image a soft rectangular power window has been added after of the look to lower the exposure of the sky. Notice how it's just taking the existing colours and lowering their luminance (and adding a bit of saturation in the process).
- The third image is the exact same correction as in the second image, but this time it has been added before the look. Notice how the darker values are now picking up the colours from the look.
While both of these examples are neither right or wrong, I think it's important to understand the difference the order of operations can make, allowing you to place your exposure corrections where they need to be for the desired result.
3. Localised Colour
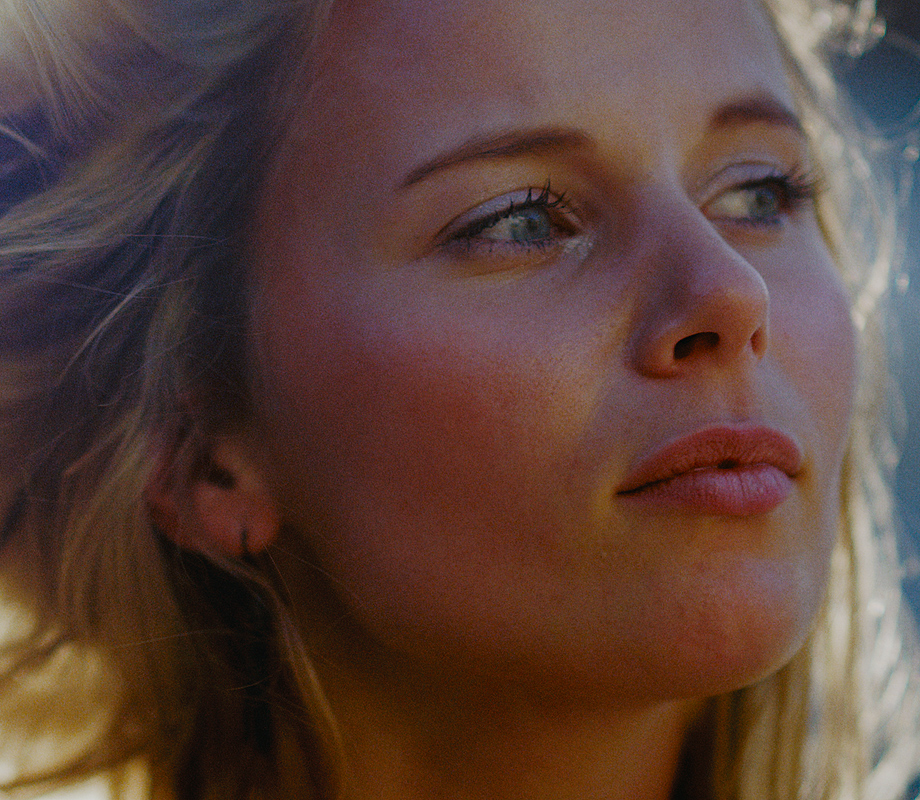
This stage is similar to stage 2 but the corrections now focus on colour. It's a combination of correcting elements that weren't right at the time of shooting, such as correcting wardrobe colours etc. But it's also creative, and is the first stage of building the look. Colours or elements such as skin tones are qualified, corrected, and then pushed where they need to be. This is usually a back and forth process carried out at the same time as building the bulk of the look in stage 4.
4. Look
By now the image should be both technically and aesthetically pleasing and in a lot of cases this fourth stage might not be necessary. But sometimes you'll want to push the grade further. Think of this stage as an overall look you're applying globally to the image (or most of the image). Such as warming the image by adding orange to the mids and highs or adding teal to the neutrals and cool colours to achieve the blockbuster look.
After adding the look you'll find that sometimes some of the colours underneath might need to be adjusted. Maybe the skin is far too warm after adding the orange to the mids and highs. At this point I go back and make the required qualifications and adjustments in stage 3.
Like I said, it's a back and forth process. Making mostly global changes in stage 4 and localised changes in stage 3 and even going back to stage 2 to make exposure adjustments.
5. Final Adjustments
In some ways this last stage is an extension of stage 4. This stage usually consists of making final adjustments to really glue all the stages together. Here is where I sometimes add a curve, make final exposure adjustments, add or remove contrast, lift and tint the blacks and tweak the overall saturation. This is usually carried out in a single node that sits right at the end of the grade. Think of this node as an adjustable LUT. It is applied to all the clips in the project and apart from saturation I usually don't adjust it on a clip to clip basis. Keeping this last node mostly unchanged is an easy way to ensure there is consistency in the grade between all the clips.
Inside Resolve
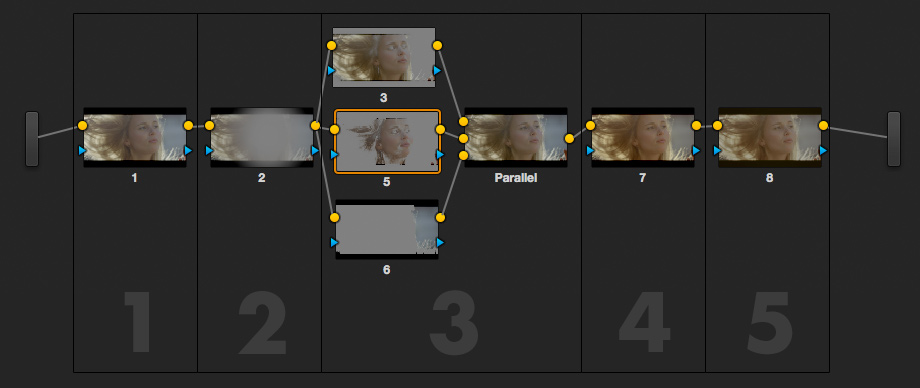
Above is this plan in it's most basic form as setup inside Resolve. This example is made up of only serial and parallel nodes. Of course you're not limited to just these nodes.
If you're not familiar with the different nodes available in Resolve, read the explanations below.
Serial Nodes
Serial nodes are easy to understand. Corrections are applied in series and added on top of the corrections from the previous node. In the example above I've balanced the image in node 1, this is then input into node 2. In node 2 I've used a circular power window to darken the edges of the image. Now the output of node 2 is the sum of the corrections from node 1 and node 2. The output of node 2 is now considered our master image, all corrections in stage 3 will be carried out on this master.
For the majority of adjustments serial nodes are all you need.
Parallel Nodes
Nodes setup in parallel apply their corrections to the input at the same time. This is also regardless of where they appear on the parallel stack. To illustrate the difference between serial and parallel nodes lets look at nodes 3 and 5 in the example above. In node 3 I've qualified the skin and pushed it a little warmer. In node 5 I've qualified the redder parts of the skin and pushed them further towards red. If I did this with serial nodes it would be difficult to qualify the reddest parts of the skin in node 5 since warming the skin in the previous node (node 3) might remove the the red from the skin entirely, making it difficult/impossible to qualify. This doesn't occur in parallel since both nodes 3 and 5 have access to the same quality information being output from node 2.
Layer Nodes
Layer nodes have a similar appearance to parallel nodes, but their functions can be quite different. Think of layer nodes as a horizontal stack of corrections with priority given to nodes lower in the stack. To reveal the corrections of nodes higher in the stack, you need to qualify elements in the lower nodes. Anything outside of that qualification will show through. At the same time you can select the composite mode (add, multiply, overlay etc) that dictates how all the nodes are combined. I like to use layer nodes to split the image in 2, applying a set of corrections from multiple nodes to the image and then then bringing back uncorrected parts of the image and layering them on top. Check the Summer Blockbuster tutorial for an example of this.
For a better explanation of these nodes read page 468 of the Resolve 9 manual.
For a really good visual explanation of the differences between serial, parallel and layer nodes watch the following video by Gray Marshall and check out his blog.
Resolve 9: Parallel vs. Layer Nodes from Gray Marshall on Vimeo.
Order of operations
While its quite difficult to make destructive corrections which cant be reversed in downstream nodes, it's still crucial to make corrections in an order that allows creative flexibility downstream. I'm quite often sent screenshots of grades where the user has applied a look too early in the node tree, sometimes even in the first node. This has then made it difficult to qualify elements such as skin in subsequent nodes. This issue can largely by avoided by making the corrections prior to the look (such as in parallel in stage 3). I also often see grades that didn't balance the image adequately in the first node, leading to similar qualification issues. Fixing this issue is usually harder since making global changes to the image balance when a look has already been applied, can sometimes require the look to be rebuilt.
For this reason it's important to treat the image with respect at each stage, to ensure you're handing over good data to the following stage. This is a lot easier than trying to correct problems by adding more nodes downstream. After stage 4, its unlikely I will make colour based qualifications, so theres no issues blanketing the image with a global look and its precisely for this reason I leave the application of a look towards the end of the node tree.
Destructive corrections / clipping data
Speaking of destructive corrections there a few instances where Resolve allows you to destroy or clip data which can't be recovered in subsequent nodes. Clipping occurs with the application of LUTs, Soft Clips and Vs Curves (regular Curves are fine). For this reason try and limit their usage towards the end of your grade where you won't be needing the clipped data.
For a really good explanation of the instances that Resolve allows clipping, check out another video by Gray Marshall.
Resolve Tips: Accidental Clipping in DaVinci Resolve v9 from Gray Marshall on Vimeo.
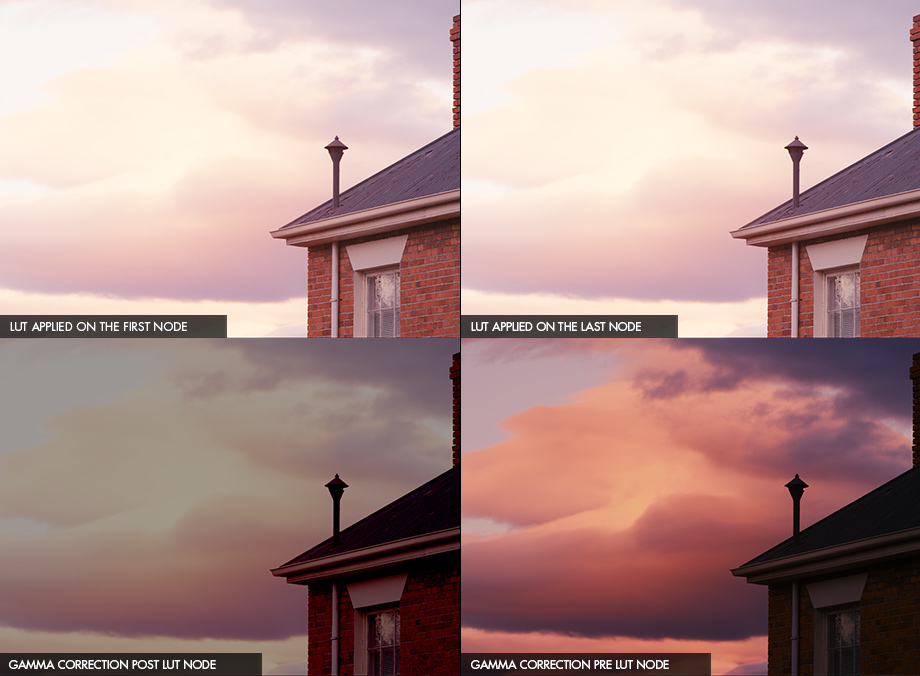
This clipping of data is one of the reasons I recommend that LUTs be applied on the very last node or through the node tab, it just produces better results.
To illustrate this - below is an example of the same gamma correction applied after the LUT node (left) and before the LUT node (right). And whilst the LUT isn't clipping the image into white, it's still restricting the colours, which prevents them from getting richer as would be expected when lowering the gamma.
Conclusion
Whilst there really are no right or wrong ways to structure your grade, from experience I find there a structures that order corrections in a way that tend to produce consistently better results. If anything consider the order in which you make your corrections and question whether there is an easier, cleaner more logical way to achieve the same if not better result.
As always if you have any questions or comments use the comment form below or feel free to drop me an email.