Exporting for Youtube and Vimeo
I occasionally get asked how I export videos for Youtube and Vimeo. The process is actually super simple as you will see below.
When exporting the goal is obviously to create the highest quality file possible as this ensures the best results after the platform re-encodes the upload. There are two main methods I use to output this high quality file and the method I use generally depends on the project’s runtime.
1. Upload the Final Master
For videos of around a minute or shorter I usually just upload the final master. This will likely be a Prores 444/422HQ file of around 1-5GB in size. This is quick to export and usually quick to upload. And I will already have it on hand as it’s also likely my final deliverable. If a 1GB file is still too big for you to upload or if your Vimeo account has a data quota, keep reading.
2. UPLOAD AN x264 FILE ENCODED FROM AN INTERMeDIATE FILE
For projects with a longer runtime, quality has to be balanced with a manageable file size. Therefore for projects of around a minute or longer, I usually export a high quality intermediate or mezzanine file then re-encode that as a more manageable x264 file.
I can already hear you asking, “why not just export an x264 file directly out of Resolve (or other NLE) and cut out the intermediate step?” There are two main reasons for this. First, NLE’s generally don’t have very good or efficient x264 encoders. They usually produce large files that are poor in quality all while taking a long time to encode. Second, if you have multiple deliverables with different encoding requirements or if you make a mistake with your encode settings, you will need to re-render the entire project with each new encode. If your project is complex or features processor intensive tasks like noise reduction, this is going to take a long time.
A better method is to split this task in two. Output a high quality intermediate from Resolve, then re-encode into x264 via a high quality, standalone x264 encoder.
For the intermediate I usually export a Prores 444/422HQ file. For the x264 encode I use HandBrake. HandBrake is a high quality x264, x265 encoder that is available for MacOSX, Windows and Linux. It’s easy to use and produces files that are smaller and higher quality than what is produced from the standard encoders found in NLEs.
OUTPUT FROM RESOLVE

I don’t do anything special when exporting intermediate files from Resolve, above are my typical output settings.
If the file is to be used purely as an intermediate file for online video encodes, you can use 422HQ over 4444. The difference between 442HQ and 4444 won’t be noticeable in the final encode. If you’re on a platform that doesn’t support Prores, you can try the DNxHR codec or any other high quality visually lossless codec. Also note that resolution and frame rate will likely change depending on your project.
If you’re on a Mac and if how the video appears in Quicktime is important to you, set the Color Space Tag to Rec709 and Gamma Tag to Rec709-A. This will create a closer match to how the video appears on your reference monitor.
ENCODe WITH HANDBRAKE

Once you’ve output your file, open HandBrake, drag and drop your file, click the Video tab and you will be presented with the main screen above. This screen houses most of the settings we will need to adjust. Let’s take a closer look.
This section allows you to select the Video Encoder, the Framerate and whether the Framerate is Variable or Constant. For the Video Encoder I just leave it as x264. I set the Framerate to Same as source, then select Constant Framerate.
This section controls the quality of the encode. This can be adjusted either via the Constant Quality slider or via the Average Bitrate field. Unless I need to hit a specific bitrate target, I always just use the slider. Values of between 12-16 generally produce results that are almost identical to the intermediate file. Values above 16 will start to show some compression artifacts the higher you go. Values below 12 generally don’t produce noticeably better results. I usually just select a value of 14-15.
This section controls the Encoder Settings. The Preset slider controls the speed of the encode. The slower the speed, the better the quality of the encoded video but the longer it takes to encode. I generally change this to “slower.” Tune allows you to select a preset. I generally select Film. And to be honest as long as you keep the Constant Quality slider below 16, you likely won’t see any difference between the presets. I leave the Profile as Main. And the Level can be left as 4.0 for 1080p or lower resolution files. If you need to encode UHD or larger videos, change the Level to 5.1.

Moving onto the Filters tab above, I make sure to switch everything to Off. You don’t want Handbrake performing any smart filtering on your video.

Moving to the Dimensions tab, make sure that Cropping is set to None under Orientation & Cropping. If your video features a letterboxed or pillarboxed sequence, HandBrake will see the black borders and annoyingly assume you want the entire video cropped to this aspect ratio.
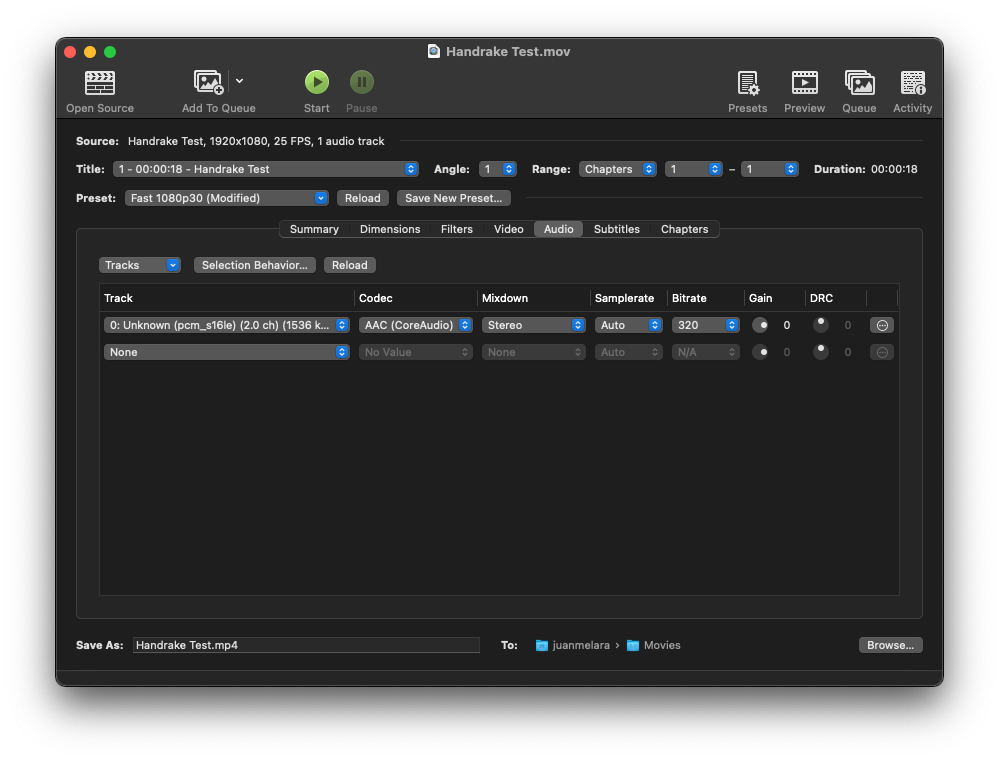
In the Audio tab I usually just set the Bitrate to 320.
Once all that is setup, hit the Start icon at the top and you’re done.